Prerequisites
- Heex system requirements
- API_KEY. Should be accessible on your workspace on the Heex Web Interface under the workspace section API Keys.
- If you would like to deploy your own packaged Heex Agent, please ensure that you did this step.
Installation Steps
You can install our heex-installer via apt.First, make sure you add heex to your apt trusted environments. Once you have done that, run the following command: If your system is not yet supported, contact us and we will work with you to provide you an adequate installer. Ubuntu 20.04, 22.04 and 24.04 on arm64 and x86_64 are the ones we have tested the installer on. In your terminal, run the following:
heex-installer command. Any future update of our CLI shall be retrieved using sudo apt update && sudo apt install --only-upgrade heex-installer
📝 Note: Note If for some reason you can’t install via apt, you can also direct-download our heex-installerOnce the download is complete, install Heex on your system. To do so, you can either create a new system directly using the
heex-installer, or you can install an existing system that has already been set up:
- create a new system before installing it
- install an existing system
What will the Installer do ?
The installer will check if a system with the specified name already exists; if not, it will create a new system with the provided name. It will attempt to fetch your custom Heex Agent, or install the default Heex Agent, which includes only the Heex Kernel and our builtin implementations (ie RDA). The installer will then install the runtime environment and download the associated configuration file, if defined. The installation status will be reported on the web platform.
⚠️ Warning: system name with special characters
If your system name contains special characters (i.e ’), use double quotes before and after your names.
For example, for a system called test’s system, provide that as --name “test’s system”.
📝 Note: You can callheex-installer --helpto list the different--system-categorypossible values, and more.
Heex Installer Command Line Options
| Option | Description |
|---|---|
--help, -h | Show this help message and exit. |
--version, -v | Shows the version of the heex-installer. |
--system-id, -si | [optional] System ID. If not given, you will create a new system. |
--api-key, -k | Add your user api secret_key which can be found on the cloud. |
--execution-mode, -x | [optional] Execution mode: ‘background’ for background process or ‘service’ (default). |
--auto-approve, -aa | [optional] In case an Agent is already installed on your system, setting this flag will automatically approve the uninstallation of the current Agent before installing the new one. |
--name, -n | [mandatory if no system-id provided] System code name (name display for your system in the UI). If the name of your system contains special characters such as ’, enclose with double quotes "". For example, —name “John’s dev station”. |
--system-middleware, -mid | [optional] System middleware. To see available options, please run heex-installer --help. |
--system-category, -cat | [mandatory if no —system-id given] System category. To see available options, please run heex-installer --help. |
--installed-version, -iv | [optional] Forces the installed agent version to given one. Example: --installed-version 2025.7.1 |
--sdk-debug-logs, sdl | Enable SDK debug logs (e.g. sets installed Agent log level to debug. SDK > 2026.02.7 required). |
Verification
To confirm that Heex is correctly installed, navigate to the status page of your system on Heex Cloud while selecting the appropriate system. You should see the Agent runtime version that was installed in your system.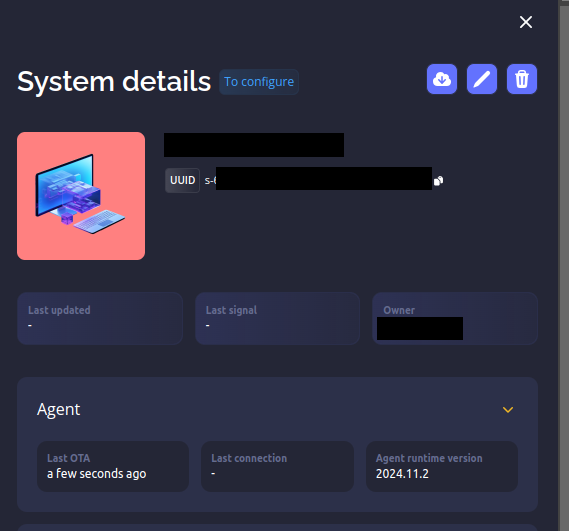
Using a PROXY
You can configure and use Proxies with theheex-installer the same way as with the CLI. If you intend to do so, please take a look at how to use a Proxy with the CLI.
[Not recommended] Following commands are for any user that can’t install the heex-installer via the apt process: